在线OJ系统
[toc]
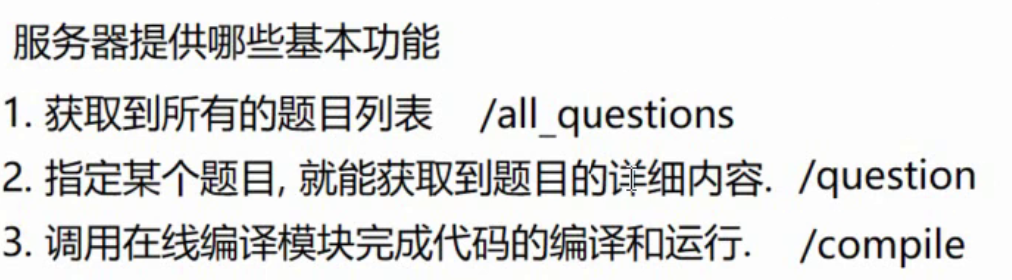
分析需求
- 有一个题目的列表页面
- 点击某个具体的题目,跳转到一个题目详情页的页面
详情页包含的内容
- 题目的要求
- 代码的编辑框
- 提交代码后的结果
模块划分
- 在线编译器 :把网页的代码提交到服务器上,进行编译运行,验证
- 题目管理模块 管理当前系统上所有与的OJ题目和,能够和网页端进行交互,获取到所有的题目列表以及某个题目的详细情况
在线编译器
compiler
编译原理=>怎么写一个编译器(极其难)
《龙书》

《虎书》

《鲸书》

https://cloud.tencent.com/developer/news/213107
还是使用gcc和g++就可以了,==关键是“在线”提交==,把代码通过网络提交到服务器上,服务器调用g++完成编译,并且调用可执行程序,验证程序结果
HTTPserver服务器
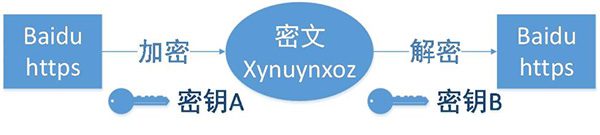
HTTP 纯文本协议 –如果攻击者截取了Web浏览器和网站服务器之间的传输报文,就可以直接读懂其中的信息
HTTPS –HTTPS在HTTP的基础上加入了SSL协议,SSL依靠证书来验证服务器的身份,并为浏览器和服务器之间的通信加密。
所以要搭建一个HTTP服务器并完成在线编译的核心功能
了解第三方库和开源项目
借助第三方库,来快速搭建,20行代码,自己来太慢了
https://github.com/yhirose/cpp-httplib 大佬写的第三方库
快速上手开源项目怎么操作
读Readme
A C++11 single-file ==header-only== cross platform HTTP/HTTPS library.
It’s extremely easy to setup. Just include the httplib.h file in your code!
NOTE: This is a multi-threaded ‘blocking’ HTTP library. If you are looking for a ‘non-blocking’ library, this is not the one that you want.
只要包上头文件就可以使用了,header-only是现代c++推荐标准,c++98提倡的是.cpp+.h因为编译速度快,现在没有问题了,所以推荐直接.h,直接一次性函数定义和实现,但是编译速度明显慢了
C++20出来了module,也就是一个组织化文件,这样优化了
doc
doc是项目具体的使用方法
example/test
代码和例子的源码测试形式
issue
其他人使用的时候遇到的问题,如果自己也发生了问题,而且这个问题没有人提,可以我们自己去提出
编译器实现
http server
using namespace httplib;写在main函数里面比较好一点,因为防止命名冲突,不然命名空间就失效了
#include"httplib.h"

int main()
{
  using namespace httplib;
  Server server;
  //注册一个回调函数,什么时候回调由库来决定,调用时机是
  server.Get("/hello",[](const Request& req,Response& resp){
 // 参数是(请求和响应)必需成对出现,根据请求计算相应结果

      (void)req;
      resp.set_content("<htm>hello world</html>","text/html");
      });//1.path 2.use lambda to get Func

  server.listen("0.0.0.0",9092);//端口号有要求


  return 0;
}
Linux查看端口号是否被访问
netstat -anp | grep [端口号]netstat -anp:显示系统端口使用情况
同一个端口能不能被两个进程绑定,可能会,比如说有父子进程互相影响
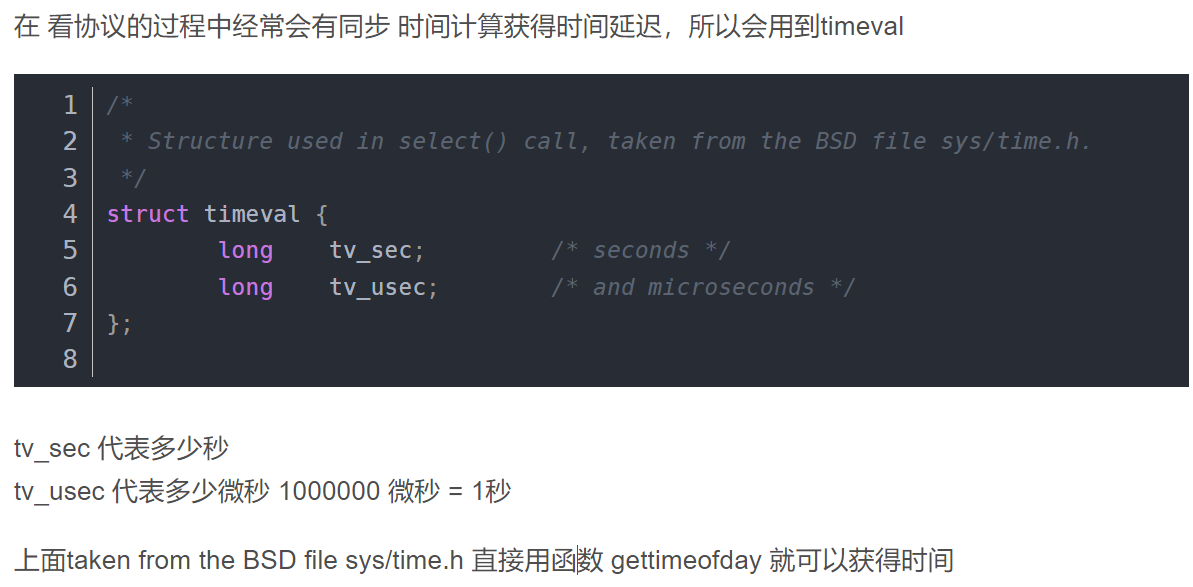
util.hpp
时间戳
#include <sys/time.h>
///////////////////////////////////////////////////////
// 封装时间戳获取函数
///////////////////////////////////////////////////////

class TimeUtil {
public:
  static int64_t TimeStamp() {
    struct timeval tv;
    ::gettimeofday(&tv, NULL);
    return tv.tv_sec;
  }

  static int64_t TimeStampMS() {
    struct timeval tv;
    ::gettimeofday(&tv, NULL);
    return tv.tv_sec * 1000 + tv.tv_usec / 1000;
  }
};
日期的级别和inline知识点
日志的级别
- FATAL
- ERROR
- WARNING
- INFO
如果函数声明定义都写到了头文件中,又没有加上inline的话编译就会失败,当有两个源文件包含该头文件中的时候就会出现链接错误
inline 函数并不是必须定义在头文件中,但是一个好的工程习惯是将其定义在头文件中。
(核心)
inline 函数在链接的时候仅仅在单个 cpp 文件中“可见”,并不是全局“可见”,其实是因为 inline 函数没有被编译成汇编码,无法用于链接。
inline函数仅仅是一个建议,对编译器的建议,最后能否真正内联,还要看编译器,并不是说声明了内联就会内联,声明内联只是一个建议而已。
C++ 中在类中实现的成员函数会被编译器自动默认判定为 inline 函数。
打印日志的工具
期望的日期格式[I1544678896 util.hpp:24] hello
#include <iostream>
///////////////////////////////////////////////////////
// 封装一个简单的日志库
///////////////////////////////////////////////////////

enum LogLevel {
  INFO,
  WARNING,
  ERROR,
  FATAL,
};

// 日志格式形如:
// [I1544678896 util.hpp:24] hello
inline std::ostream& Log(LogLevel level, const std::string& file_name,
    int line) {
  std::string log_prefix = "[";
  if (level == INFO) {
    log_prefix += "I";
  } else if (level == WARNING) {
    log_prefix += "W";
  } else if (level == ERROR) {
    log_prefix += "E";
  } else if (level == FATAL) {
    log_prefix += "F";
  }
  log_prefix += std::to_string(TimeUtil::TimeStamp());//时间戳用到了这里
  log_prefix += " ";
  log_prefix += file_name;
  log_prefix += ":";
  log_prefix += std::to_string(line);
  log_prefix += "] ";
  std::cout << log_prefix;
  return std::cout;
}

#define LOG(level) Log(level, __FILE__, __LINE__)
__FILE__和__LINE__时内置的宏定义,返回当前行数和文件名
这里为什么要宏定义一个__FILE__,不能直接在函数中
log_prefix += __FILE__;因为这样的话会默认每次都变成了util,而不是真正出错的位置
封装文件读写操作
一个好的规范约定(不用模仿)
输入型参数 const 引用
输出型参数 指针
输入输出型参数用引用
读文件
传入一个文件路径,帮我们把所有的文件内容读出看来放到content字符串中
///////////////////////////////////////////////////////
// 封装文件读写操作
///////////////////////////////////////////////////////
class FileUtil {
public:
  static bool ReadFile(const std::string& file_name, std::string* content) {
    content->clear();
    std::ifstream file(file_name.c_str());
    if (!file.is_open()) {
      return false;
    }
    std::string line;
    while (std::getline(file, line)) {
      (*content) += line + "\n";
    }
    file.close();
    return true;
  }

  static bool WriteFile(const std::string& file_name, const std::string& content) {
    std::ofstream file(file_name.c_str());
    if (!file.is_open()) {
      return false;
    }
    file.write(content.data(), content.size());
    file.close();
    return true;
  }
};
要点:读文件
- 用c._str(),可以有
\0 - 先把文件放到文件输入流中
- 判断有没有打开这个文件,没打开返回false
- 先取出一行放到string中,这里用到了getline
- 然后放到了content输出文件中,while循环遍历所有行
- 关闭文件,返回true
知识点:一个机器最多能打开多少个文件66535,可以修改
ulimit -a //显示写文件
 static bool WriteFile(const std::string& file_name, const std::string& content) {
    std::ofstream file(file_name.c_str());
    if (!file.is_open()) {
      return false;
    }
    file.write(content.data(), content.size());
    file.close();
    return true;
  }
};
要点:
- 先把文件放到文件输出流中
- 判断有没有打开这个文件,没打开返回false
- 直接write函数,参数是字符串内容和size
complier.hpp
此代码完成在线编译模块的功能
提供一个Compiler类,有这个类提供一个核心的CompilerAndRun函数,通过这个函数把请求转化成响应的协议报
HTTP的信息,要给服务器提供什么信息
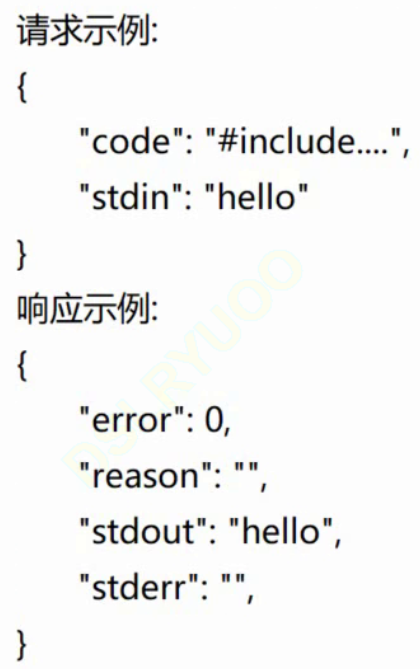
请求:
- 代码
- 标准输入的内容
- (拓展时间身份等等)
响应:
- error值 – 0正常编译运行–1 编译出错–2 运行出错–3其他错误
- reason 错误原因 如果error为9,reason就是空字符串
- 标准输出
- 标准错误
需要序列化和反序列化
JSON
JSON是一种数据组织格式,是一种序列化的方法,为什么要用到
pokemon的技能
{
    "name":pikachu,
    "move1":"十万伏特",
    "move2":"电光一闪",
    "move3":"铁尾",
    "move4":"高速移动"
}
使用JSON组织请求和响应,还有其他的序列化方式
对应的请求示例:本身还是一个字符串
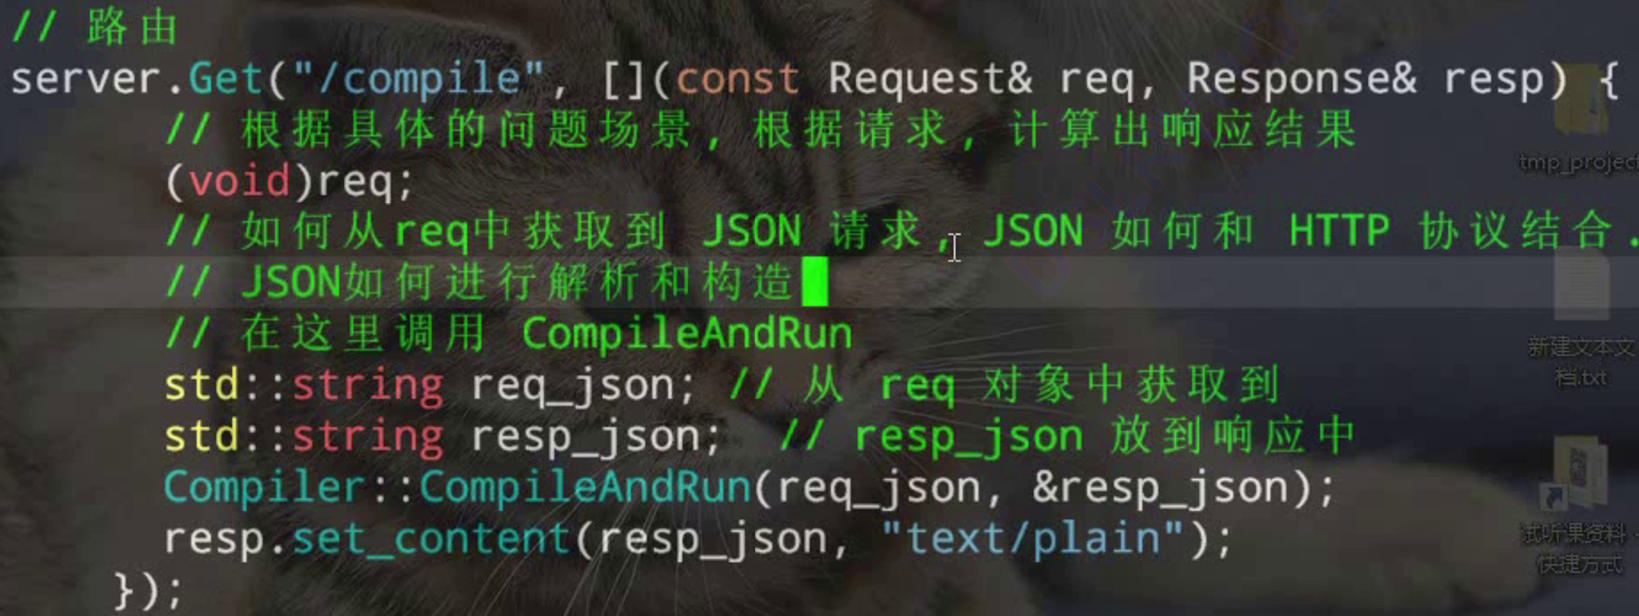
// 最核心的入口函数!
  // 提供两个版本, 只是接口参数不同. 接口为 Json 或者为 std::string
  static void CompileAndRun(const Json::Value& req, Json::Value* resp) {
在compiler_server中
核心类构思和准备
之前的这个类,此处看到的参数和返回的格式,都是JSON格式,JSON::Value类是jsoncpp的核心类,借助这个类就可以完成序列化和反序列化,该类的使用方式和map很像,可以使用[]完成属性的操作
实现编译运行
- 根据请求对象,生成源文件代码
- 调用 g++进行编译(fork + exec /system)生成可执行程序,如果编译出错,需要把编译错误记录下来(重定向到文件中)
- 调用可执行程序,把标准输入记录到文件中,然后把文件中的标准输出和标准错误内容也要重定向输出记录到文件中
- 把程序的最终结果进行返回,构造resp对象
下面的代码存在6种文件需要完成进程之间的通信
- 源代码文件
- 编译错误文件
- 可执行程序文件
- 标准输入文件
- 标准输出文件
- 标准错误文件
下面我们用那么来表示当前请求的名字,请求和请求之间,name必须是不相同的
源代码文件
对文件名字做出以下约定:
file_name(tmp_[id]): 文件名前缀.
file_name.cpp(tmp_[id].cpp): 源代码文件
同时我们把文件都放在了tmp_files这个临时文件夹中保存
static std::string SrcPath(const std::string& file_name) {
   return "./tmp_files/" + file_name + ".cpp";
 }
编译错误文件
// file_name.compile_err(tmp_[id].compile_err): g++ 编译的出错信息
  static std::string CompileErrorPath(const std::string& file_name) {
    return "./tmp_files/" + file_name + ".compile_err";
  }
可执行文件
可执行文件后缀只适用于Linux
知识点:
Windows可执行程序的格式是PE
Linux可执行程序是 ELF
由于这两个文件中代码和数据放的偏移位置都是不一样的,他们的约定方式都是不一样的,不能窜用,于是这可能造成了无法跨平台执行
但是CentOS7上编译的程序在Ubuntu上可以运行吗?
很可能不行,主要还是ELF是一样的,但是关键是,ELF依赖的是不同的动态库,所以说可能运行,但是很可能程序跑着跑着崩掉了,所以能不能只依靠静态库方式的化,就是可以跨平台的
go/rust语言也和C++有相同的问题遇到,但是Go语言会保证依赖的系统库都是静态库,虽然编译的可执行文件比较大,但是可以解决以上的问题,可以一个操作系统随便跑
// file_name.executable(tmp_[id].executable): g++ 生成的可执行程序
  static std::string ExePath(const std::string& file_name) {
    // 此处加上相对路径. 方便后面 exec 的时候就不用构造路径了.
    // 另外这里再强调一下, 这个可执行程序和 windows 的 exe 不一样.
    return "./tmp_files/" + file_name + ".executable";
  }
标准输入/输出/错误文件
// file_name.stdin(tmp_[id].stdin): 运行依赖的标准输入的内容
 static std::string StdinPath(const std::string& file_name) {
   return "./tmp_files/" + file_name + ".stdin";
 }
 // file_name.stdout(tmp_[id].stdout): 运行生成的可执行程序得到的标准输出结果.
 static std::string StdoutPath(const std::string& file_name) {
   return "./tmp_files/" + file_name + ".stdout";
 }
 // file_name.stderr(tmp_[id].stderr): 运行生成的可执行程序得到的标准错误结果.
 static std::string StderrPath(const std::string& file_name) {
   return "./tmp_files/" + file_name + ".stderr";
 }
实现核心类
根据请求对象,生成源代码文件
注意需要先检查code字段是否存在
如果存在的话req[“code”]根据key取出value,通过Jason::asString方法来转成字符串,现在手上有了string类型的code
通过一个函数把代码code写到代码文件中,并且拿到该文件的file_name
// 1. 生成源代码文件
    // 先检查下 code 字段是否存在
    if (req["code"].empty()) {
      (*resp)["error"] = 3;
      LOG(ERROR) << "ParseReq failed! code empty!";
      return;
    }
    const std::string& code = req["code"].asString();//代码
    const std::string& std_input = req["stdin"].asString();//标准输出
    std::string file_name = WriteTmpFile(code, std_input);
    //特殊情况
    if (file_name == "") {
      (*resp)["error"] = 4;
      LOG(ERROR) << "WriteTmpFile failed!";
      return;
    }
注意代码的优化,减少拷贝
调用g++编译,记录编译错误
编译程序,如果出错就记录错误,error=1
通过之前有一个错误记录文件CompileErrorPath,写到reason中
存到LOG文件中
if (!Compile(file_name)) {
  (*resp)["error"] = 1;

  std::string reason;
  FileUtil::ReadFile(CompileErrorPath(file_name), &reason);
  (*resp)["reason"] = reason;

  LOG(ERROR) << "Compile failed! check " << file_name;
  return;
}
调用可执行文件,把标准输入记录到文件中然后把文件中内容重定向到可执行程序,记录标准输出和标准错误文件
运行时出错有三种可能性
- 代码执行完结果正确 –司马懿
- 代码执行完结果错误 –诸葛亮
- 代码还没执行完,就异常终止 –孙伯符
这里我们通过Run函数来返回错误问题,接收了信号看看有没有Run Error
这里的问题级别好像是INFO,这里的错误时用户自己的错误不是服务器的错误
int sig = Run(file_name);
    if (sig != 0) {
      (*resp)["error"] = 2;
      (*resp)["reason"] = "Program exit by sig " + std::to_string(sig);
      LOG(INFO) << "Run error! check " << file_name << ", sig: "
                 << sig << "\n";
      return;
    }
把程序的最终结果进行返回,构造resp对象
最后没有问题也要返回
(*resp)["error"] = 0;
 (*resp)["reason"] = "Compile and Run OK!";

 std::string stdout_result;
 FileUtil::ReadFile(StdoutPath(file_name), &stdout_result);
 (*resp)["stdout"] = stdout_result;

 std::string stderr_result;
 FileUtil::ReadFile(StderrPath(file_name), &stderr_result);
 (*resp)["stderr"] = stderr_result;
WriteTmpFile
static 关键字的作用: 改变生命周期
通过这个函数我们需要的是达到完成写文件的作用,给这次请求分配一个唯一的名字,通过返回值返回
我们希望的是返回的形式形如tmp_[时间戳]+请求顺序+文件后缀,为了防止一秒之内要很多请求所以可以通过这个时间+请求解决问题
Linux获取时间戳
data +%s这里的请求数id怎么来做,首先为了多个线程可以++,我们将他设置为static,要保证线程安全吧起码,所以这里不能加锁,因为这里付出的开销巨大
我们这里借鉴信号量机制,来使用原子单位的计算,这里核心的依赖是CPU
#include<atomic>
private:
  // 这个函数需要生成临时文件名. 由于同时可能会并行执行多个编译任务, 不同的编译任务需要区分开
  static std::string WriteTmpFile(const std::string& code,
      const std::string& std_input) {
    // 此处应该是一个静态的变量, 并且要能够保证线程安全.
    static std::atomic_uint id(0);
    ++id;
    // 文件名形如: tmp_1545299993.1
    std::string file_name = "tmp_" + std::to_string(TimeUtil::TimeStamp())
                            + "." + std::to_string(id);
    FileUtil::WriteFile(SrcPath(file_name), code);
    FileUtil::WriteFile(StdinPath(file_name), std_input);
    return file_name;
  }
Compile
来一点知识点
exec执行新进程
l 用参数列表的方式,最后一个参数时NULL
v 把2参数放在数组内,数组最后一个值是NULL
e 用新的环境变量,最后一个是存放新的环境变量的字符串数组
p 用文件名,非p用的时全路径
原型:
int execl(const char *path, const char *arg, …);
int execlp(const char *file, const char *arg, …);
int execle(const char *path, const char *arg, …, char * const envp[]);
int execv(const char *path, char *const argv[]);
int execvp(const char *file, char *const argv[]);
参数:
path参数表示你要启动程序的名称包括路径名
arg参数表示启动程序所带的参数,一般第一个参数为要执行命令名,不是带路径且arg必须以NULL结束
返回值:成功返回0,失败返回-1
fork
一个进程,包括代码、数据和分配给进程的资源。fork()函数通过系统调用创建一个与原来进程几乎完全相同的进程,也就是两个进程可以做完全相同的事,但如果初始参数或者传入的变量不同,两个进程也可以做不同的事。
一个进程调用fork()函数后,系统先给新的进程分配资源,例如存储数据和代码的空间。然后把原来的进程的所有值都复制到新的新进程中,只有少数值与原来的进程的值不同。相当于克隆了一个自己。
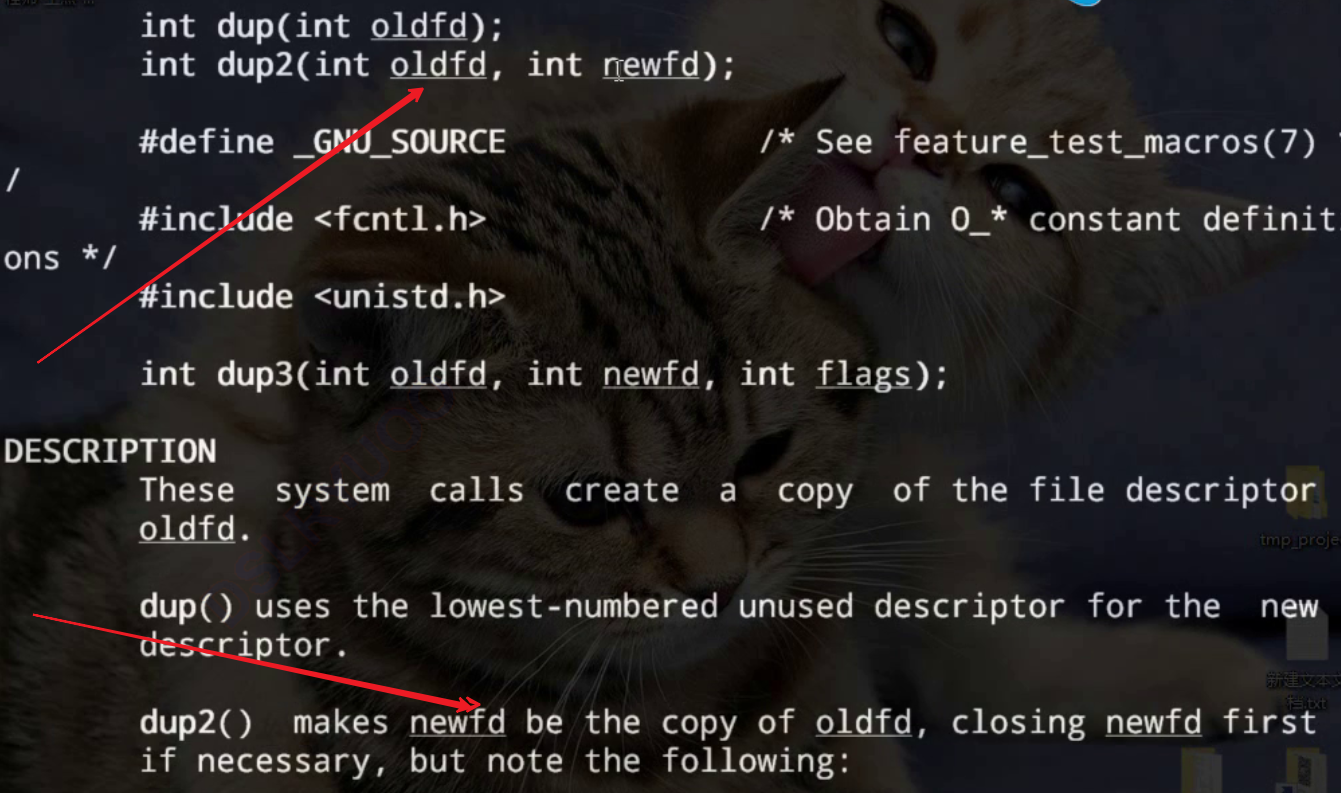
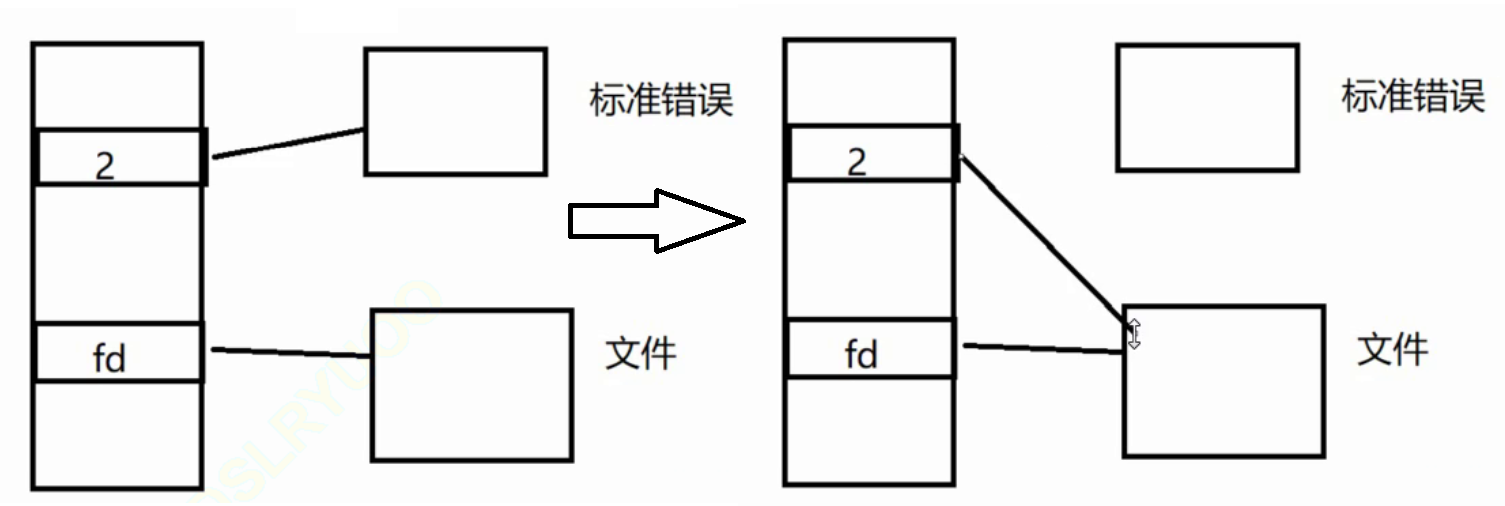
dup
man一下dup命令
dup2是往老文件写就是往新文件写入
头文件规范
头文件的规范可以学习一下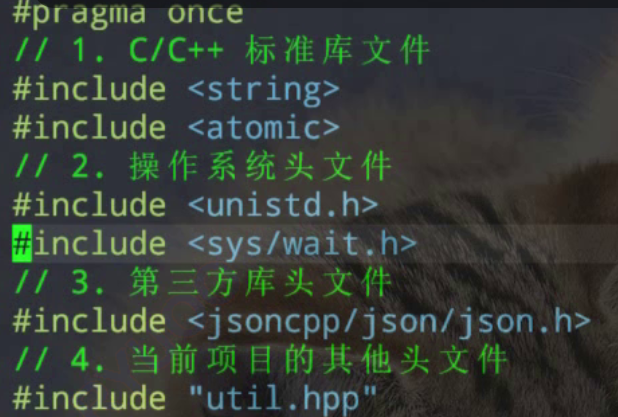
wait和waitpid
注意使用的时候搞清楚,wait就像去幼儿园接孩子,看到一个孩子出来抱起了就走,反之waitpid
什么是waitpid
如果在调用waitpid()函数时,当指定等待的子进程已经停止运行或结束了,则waitpid()会立即返回;但是如果子进程还没有停止运行或结束,则调用waitpid()函数的父进程则会被阻塞,暂停运行。pid_t waitpid(pid_t pid,int *status,int options);成功:返回清理掉的子进程ID;失败:-1(无子进程)
如果像这样调用waitpid函数:waitpid(-1, status, 0),这此时waitpid()函数就完全退化成了wait()函数。
open
open 函数可以打开或创建一个文件。
int open(const char *pathname, int flags);
int open(const char *pathname, int flags, mode_t mode);
返回值:成功返回新分配的文件描述符,出错返回-1并设置errno在Man Page中
open 函数有两种形式,一种带两个参数,一种带三个参数,其实在C代码中open 函数是这样声明的:int open(const char *pathname, int flags, …);最后的可变参数可以是0个或1个,由flags 参数中的标志位决定,见下面的详细说明。pathname 参数是要打开或创建的文件名,和fopen 一样,pathname 既可以是相对路径也可以是绝对路径。flags 参数有一系列常数值可供选择,可以同时选择多个常数用按位或运算符连接起来,所以这些常数的宏定义都以O_开头,表示or。
- 必选项:以下三个常数中必须指定一个,且仅允许指定一个。
O_RDONLY 只读打开
O_WRONLY 只写打开
O_RDWR 可读可写打开 - 以下可选项可以同时指定0个或多个,和必选项按位或起来作为flags 参数。可选项有很多,这里只介绍一部分,其它选项可参考open(2)的Man Page:
O_APPEND 表示追加。如果文件已有内容,这次打开文件所写的数据附加到文件的末尾而不覆盖原来的内容。
O_CREAT 若此文件不存在则创建它。使用此选项时需要提供第三个参数mode ,表示该文件的访问权限。
O_EXCL 如果同时指定了O_CREAT,并且文件已存在,则出错返回。
O_TRUNC 如果文件已存在,并且以只写或可读可写方式打开,则将其长度截断(Truncate)为0字节。
O_NONBLOCK 对于设备文件,以O_NONBLOCK 方式打开可以做非阻塞I/O(Nonblock I/O)
https://blog.csdn.net/simongyley/article/details/8330636
思路
在当前父进程下创建一个子进程,子进程是用来编译的,子进程编译的时候,父进程等子进程结束,如果子进程有问题就处理,如果失败的话子进程要退出,不退的话,就会变成了2个服务器
然后要判断代码执行是否成功,只要判断有没有生成可执行文件就可以了,这是我们想到了ls指令,ls就是stat实现的,ls如果找不到的话会报找不到,如果不存在的话就说明执行失败,否则就成功了,各自有自己的LOG信息
构建编译指令
g++ file_name.cpp -o file_name.exe -std=c++11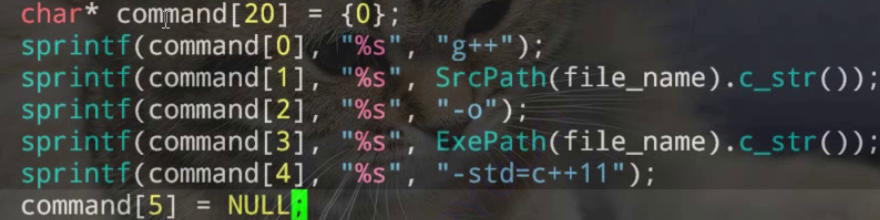
这样的写法是不可以的,因为command这个指针数组是相当于在NULL中写入,肯定是错的,所以要至少给每一个指针指向的是有效内存
malloc不太好用,最好在栈上弄一个数组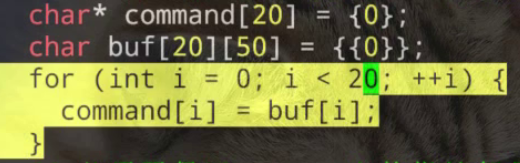

最好的方法就是Java大法好,不然自己去搞内存,太麻烦
推荐书籍《七周七语言》,装B使用创建子进程
父进程进行进程等待
a. 打开文件int fd = open(CompileErrorPath(file_name).c_str(),O_WRONLY | O_CREAT, 0666);子进程进行程序替换
判定最终是否生成可执行程序. 如果生成成功, 则认为编译成功.
打开文件失败 : ERROR等级LOG一下,记录下
这里我们希望写2的效果得到的是能够把数据放到文件中
#include <unistd.h>
#include <sys/wait.h>
#include <sys/stat.h>
#include <fcntl.h>
#include <sys/resource.h>
static bool Compile(const std::string& file_name) {
    // 1. 创建子进程
    int ret = fork();
    if (ret > 0) {
      // 2. 父进程进行进程等待. g++ 应该不会异常终止吧?
      waitpid(ret, NULL, 0);
    } else if (ret == 0) {
      // 3. 子进程进行重定向和程序替换(替换成刚才构造的指令)
      int fd = open(CompileErrorPath(file_name).c_str(),
          O_WRONLY | O_CREAT, 0666);
      if (fd < 0) {
        LOG(ERROR) << "open failed!\n";
        return false;
      }
      dup2(fd, 2);  // 此处照例要对着 man 手册琢磨一下
      // execvp(command[0], command);
      execlp("g++", "g++", SrcPath(file_name).c_str(), "-std=c++11",
          "-o", ExePath(file_name).c_str(), "-D", "CompileOnline", NULL);
      exit(0);  // 这个 exit 至关重要, 如果替换失败, 就要让子进程销毁.
    } else {
      LOG(ERROR) << "fork failed!\n";
      return false;
    }
    // 5. 判定最终是否生成可执行程序. 如果生成成功, 则认为编译成功.
    struct stat st;
    ret = stat(ExePath(file_name).c_str(), &st);
    if (ret < 0) {
      LOG(ERROR) << "Compile failed! check " << file_name << "\n";
      return false;
    }
    return true;
  }
Run
希望把进程状态返回给系统服务器,通过给到status’
status & 0x7f 最后7位是
// 返回值为子进程终止的信号
  static int Run(const std::string& file_name) {
    // 1. 创建子进程.
    int ret = fork();
    if (ret == 0) {
      // [限制运行时间]
      // 注册闹钟, 1秒钟之后通过 闹钟信号 终止进程.
      // 通过这种方式限定 Oj 程序的执行时间.
      alarm(1);
      // [限制内存使用]
      // #include <sys/resource.h>
      struct rlimit rlim;
      rlim.rlim_cur = 32768 * 1024;    // 内存限制 32768KB
      rlim.rlim_max = RLIM_INFINITY;   // 无限制
      setrlimit(RLIMIT_AS, &rlim);
      // 2. 子进程进行重定向(标准输入和标准输出都需要重定向)和程序替换
      //    此处的标准输入, 标准输出和标准错误采用文件方式处理, 方便进行调试或者后续归档.
      //    由于这是新鲜创建好的子进程, 因此打开文件就不检查出错了(捂脸)
      //    [注意] 此处不能用管道来重定向标准输入. 管道和普通文件终究还是存在差别,
      //    会导致客户端代码进行 std::cin 的时候不能够顺利的把数据读干净.
      //  a) 对标准输入重定向
      int fd_stdin = open(StdinPath(file_name).c_str(), O_RDONLY);
      dup2(fd_stdin, 0);
      //  b) 对标准输出和标准错误重定向
      int fd_stdout = open(StdoutPath(file_name).c_str(),
          O_WRONLY | O_CREAT, 0666);
      dup2(fd_stdout, 1);   // 往标准输出中写, 相当于写文件
      int fd_stderr = open(StderrPath(file_name).c_str(),
          O_WRONLY | O_CREAT, 0666);
      dup2(fd_stderr, 2);   // 往标准错误中写, 相当于写文件
      //  c) 进行程序替换
      execl(ExePath(file_name).c_str(), ExePath(file_name).c_str(), NULL);
      LOG(ERROR) << "exec failed!" << strerror(errno) << "\n";
      exit(0);
    }
    // 3. 父进程等待子进程结束(这里就需要判定异常终止的情况了)
    //    上面使用了 alarm 作为执行时间的控制. 也可以改成非阻塞轮询 更精细的处理超时问题
    //    最好把这个时间设定成可配置, 不同的题目要求执行不同的时间.
    int status = 0;
    waitpid(ret, &status, 0);
    return status & 0x7f;
  }
在线实现
知识点
C++字符串和C语言字符串
- C语言中的字符串是用字符数组来模拟字符串
- C语言比C++多一个
\0,可能导致程序危险 - C++字符串不用考虑\0
- C++字符串获取长度可以用str.length/size,复杂度是O(1)
- C++字符串不用管理销毁,可以变长
写时拷贝(copy-on-write, COW)就是等到修改数据时才真正分配内存空间,这是对程序性能的优化,可以延迟甚至是避免内存拷贝,当然目的就是避免不必要的内存拷贝。
写时拷贝其实我们并不陌生的,Linux fork和stl string是比较典型的写时拷贝应用
思路
HTTP协议中哪些部分可以有用户自己定制的数据
- URL后面的参数(键值对的方式)
- header部分
- body部分
HTTPS还不够保护用户名和密码,其实后台就可以加一个密钥,不能明文传输
通过一定的解析和变换来把JSON格式转化成HTTP所需要的格式,然后再给到编译器
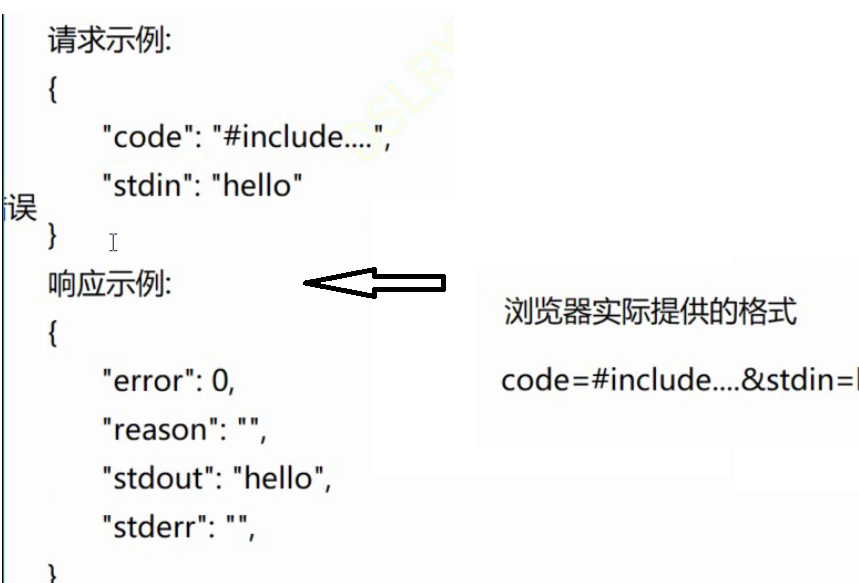
但是发现body中含有=等等的&什么的特殊符号需要分辨,我们可以使用urlencode,就是通过%来变换,这个过程其实浏览器会自动转换,不够服务器收到请求之后需要先decode,然后再解析数据,整理成我们需要的JSON格式
这里的键值对我们用map好还是unordered_map?
我们一般平常使用unordered_map,而且我们对数据也没有顺序的要求,所以毕竟他快啊,所以使用的是Hash表
参数格式转换
// 1. 先进行参数格式的转换
   std::unordered_map<std::string, std::string> body_kv;
   UrlUtil::ParseBody(req.body, &body_kv);
   Json::Value req_json;
   for (const auto& p : body_kv) {
     req_json[p.first] = p.second;
   }
封装UrlUtil
///////////////////////////////////////////////////////
// 封装 url 相关操作
// 参考 https://blog.csdn.net/gemo/article/details/8468311
///////////////////////////////////////////////////////
class UrlUtil {
public:
	static std::string UrlEncode(const std::string& str) {

	static std::string UrlDecode(const std::string& str) {
  // 将 Post 请求中的 body 直接进行解析
  // 使用 boost 来直接 split.
  // #include <boost/algorithm/string.hpp>
  static void ParseBody(const std::string& body,
      std::unordered_map<std::string, std::string>* params) {
private:
	static unsigned char ToHex(unsigned char x) {

	static unsigned char FromHex(unsigned char x) {
};
ParseBody
对Body切分
 a. 先按照 & 符号切分

 b. 再按照 = 切分
对键值对urldecode
怎么实现切分:
- strtok
- stringstream
- boost 中的split函数
// 将 Post 请求中的 body 直接进行解析
// 使用 boost 来直接 split.
// #include <boost/algorithm/string.hpp>
static void ParseBody(const std::string& body,
    std::unordered_map<std::string, std::string>* params) {
  // 先进行字符串切分解析
  std::vector<std::string> tokens;
  StringUtil::Split(body, "&", &tokens);
  for (const auto& token : tokens) {
    std::vector<std::string> kv;
    StringUtil::Split(token, "=", &kv);
    if (kv.size() != 2) {
      continue;
    }
    // 针对获取到的结果进行 urldecode
    (*params)[kv[0]] = UrlDecode(kv[1]);
  }
}
Split
参数是(输入,分割符,输出)
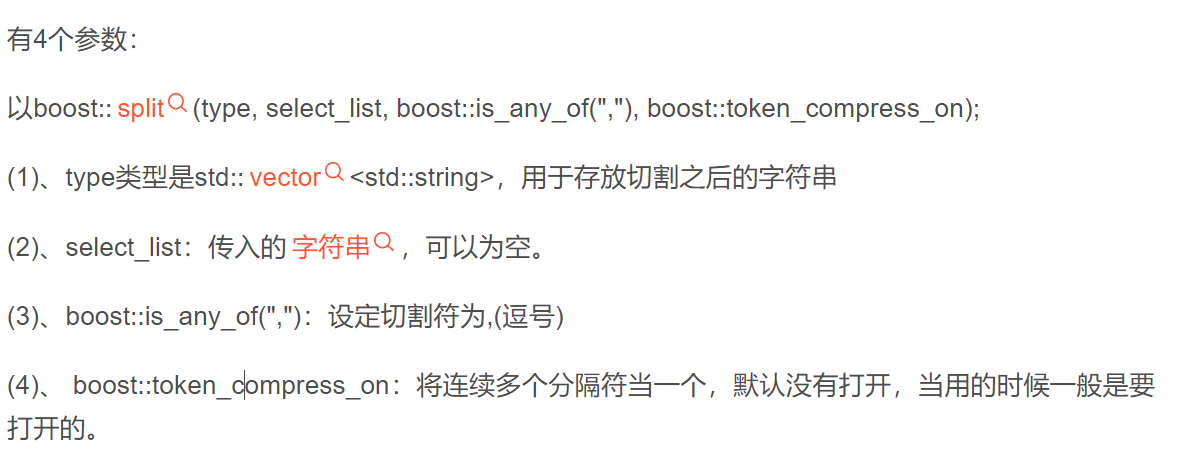
调用boost的split,参数是
#include <boost/algorithm/string.hpp>
/////////////////////////////////////////////////////
// 封装 string 常用操作
/////////////////////////////////////////////////////
class StringUtil {
public:
  static void Split(const std::string& input, const std::string& split_char,
             std::vector<std::string>* output) {
boost::split(*output, input, boost::is_any_of(split_char), boost::token_compress_off);
  }
};
boost要安装
yum install boost-develUrlEncode
下面这两个可以直接static,毕竟不用创建对象,直接用就可以了
static std::string UrlEncode(const std::string& str) {
		std::string strTemp = "";
		size_t length = str.length();
		for (size_t i = 0; i < length; i++) {
			if (isalnum((unsigned char)str[i]) ||
					(str[i] == '-') ||
					(str[i] == '_') ||
					(str[i] == '.') ||
					(str[i] == '~'))
				strTemp += str[i];
			else if (str[i] == ' ')
				strTemp += "+";
			else {
				strTemp += '%';
				strTemp += ToHex((unsigned char)str[i] >> 4);
				strTemp += ToHex((unsigned char)str[i] % 16);
			}
		}
		return strTemp;
	}
UrlDecode
static std::string UrlDecode(const std::string& str) {
		std::string strTemp = "";
		size_t length = str.length();
		for (size_t i = 0; i < length; i++)
		{
			if (str[i] == '+') strTemp += ' ';
			else if (str[i] == '%')
			{
				assert(i + 2 < length);
				unsigned char high = FromHex((unsigned char)str[++i]);
				unsigned char low = FromHex((unsigned char)str[++i]);
				strTemp += high*16 + low;
			}
			else strTemp += str[i];
		}
		return strTemp;
	}
HTML测试
<html>
  <form action="compile" method="post">
  code:<br>
  <!--input type="textarea" name="code" value=""-->
  <!-- 用textaera就是为了可以多行输入 -->
  <textarea name="code" rows=30 cols=100></textarea>
  <br>
  stdin:<br>
  <textarea name="stdin" rows=5 cols=100></textarea>
  <br><br>
  <input type="submit" formenctype="application/json" value="Submit">
  </form>
</html>
同时还要再server中设置一个根目录,作为一个静态文件
// 设定 http 服务器的根目录
 server.set_base_dir("./wwwroot");
静态文件/页面是什么?动态页面又是什么?
静态访问是每个人的访问都是一样的,动态页面就是根据不同参数,会返回不同的值
静态页面:index.html不会发生变化
动态页面:编译结果随着参数的不同而发生变化
把问题测试出来
##服务器功能
知识点
什么是MVC
MVC(经典软件设计方式)现在用的没有以前多,MVVM是新提出的
M:model负责数据存储
V:view负责显示界面
C:controller核心业务逻辑
当前的需求
基于文件的方式完成题目的存储,约定每一个题目对应一个目录,目录的名字就是题目的id
- header.cpp 代码框架
- tail.cpp 代码测试用例
- desc.txt 题目详细描述
另外还有一个总的配置文件, 是一个 行文本文件, 记录了每个题目的id, 标题, 路径, 难度信息(这个文件放到内存中).
完成一个题目的基本信息(model加载)
该文件需要实现一个 OjModel 类, 提供以下接口:
获取所有题目列表
获取某个题目的题面信息(也就是只包含 oj1.header部分的信息)
获取某个题目的完整信息(也就是 header + tail 拼接成的完整 cpp)
oj_config.cfg
1 回文数 简单 ./oj_data/1header.cpp
#include <iostream>
#include <string>
#include <vector>
#include <map>
#include <algorithm>
using namespace std;

class Solution {
  public:
    bool isPalindrome(int x) {
      return true;
    }
};
desc.txt
判断一个整数是否是回文数。回文数是指正序(从左向右)和倒序(从右向左)读都是一样的整数。
示例 1:
输入: 121
输出: true
示例 2:
输入: -121
输出: false
解释: 从左向右读, 为 -121 。 从右向左读, 为 121- 。因此它不是一个回文数。
示例 3:
输入: 10
输出: false
解释: 从右向左读, 为 01 。因此它不是一个回文数。
进阶:
你能不将整数转为字符串来解决这个问题吗?
tail.cpp
#ifndef CompileOnline
// 这是为了编写用例的时候有语法提示. 实际线上编译的过程中这个操作是不生效的.
#include "header.cpp"
#endif

///////////////////////////////////////////////////////
// 此处约定:
// 1. 每个用例是一个函数
// 2. 每个用例从标准输出输出一行日志
// 3. 如果用例通过, 统一打印 [TestName] ok!
// 4. 如果用例不通过, 统一打印 [TestName] failed! 并且给出合适的提示.
///////////////////////////////////////////////////////

void Test1() {
  bool ret = Solution().isPalindrome(121);
  if (ret) {
    std::cout << "Test1 ok!" << std::endl;
  } else {
    std::cout << "Test1 failed! input: 121, output expected true, actual false" << std::endl;
  }
}

void Test2() {
  bool ret = Solution().isPalindrome(-10);
  if (!ret) {
    std::cout << "Test2 ok!" << std::endl;
  } else {
    std::cout << "Test2 failed! input: -10, output expected false, actual true" << std::endl;
  }
}

int main() {
  Test1();
  Test2();
  return 0;
}
描述题目的信息
// 定义一个结构体描述题目信息
struct Question {
  std::string id;       // 题目的 id
  std::string title;    // 题目的标题
  std::string star;     // 题目难度
    //以下字段需要文件获取到
  std::string desc;     // 题目描述
  std::string header_cpp; // 题目代码框架
  std::string tail_cpp; // 题目测试代码
};
OjModel-M
class OjModel {
private:
  // key 为题目 id, value 为题目结构体
  std::unordered_map<std::string, Question> model_;

public:
  OjModel () {
    assert(Load("./oj_data/oj_config.cfg"));
  }

  bool Load(const std::string& config_path) {

  }

  bool GetAllQuestions(std::vector<Question>* questions) const {

  }

  bool GetQuestion(const std::string& id, Question* question) const {

  }
};
知识点
一般常用的字符串Hash算法都是 1. MD5 2. SHA1
- 好处是两者非常均匀,了两个字符串哪怕只差一个字符,也会差别很大
- 不可逆(理论上是不可能的)
- 固定长度(不管字符串多长,Hash值都是固定的长度)
const函数重载
class Test{
	void func();
    void func() const ;
}
是否构成重载,构成的,因为this指针是不同的,所以参数不同

v是volatile关键字
Load
- 打开cfg文件
- 按行读取cfg文件,并且解析
- 根据解析结果拼装加入Question结构体
- 把结构体加入Hash表中
这个load是不能加const的,因为如果加了const的话就不可以 修改model了
#include <fstream>
  bool Load(const std::string& config_path) {
    //1。打开cfg文件
    std::ifstream file(config_path.c_str());
    if (!file.is_open()) {
      return false;
    }
    //2. 按行读取cfg文件,并且解析(切分)
      std::string line;
    while (std::getline(file, line)) {
      // 针对 line 进行切分, 字段用 \t 切分
      std::vector<std::string> tokens;
      StringUtil::Split(line, "\t", &tokens);
      // 跳过出错的行,为什么是4个,因为设定的出错的是4
      if (tokens.size() != 4) {
        continue;
      }
      Question question;
      question.id = tokens[0];
      question.title = tokens[1];
      question.star = tokens[2];
      const std::string dir = tokens[3];
      FileUtil::ReadFile(dir + "/desc.txt", &question.desc);
      FileUtil::ReadFile(dir + "/header.cpp", &question.header_cpp);
      FileUtil::ReadFile(dir + "/tail.cpp", &question.tail_cpp);
      model_[question.id] = question;//塞入Hash表中
    }
    file.close();
    LOG(INFO) << "Load " << model_.size() << " questions!\n";
    return true;
  }
GetAllQuestions
bool GetAllQuestions(std::vector<Question> *questions) const
  {
    for (const auto &kv : model_)
    {
      questions->push_back(kv.second);
    }
    // 再来个排序吧, 按照 id 升序. 如果是想按照其他顺序排序
    // 只要调整 lambda 的实现细节即可.
    std::sort(questions->begin(), questions->end(),
              [](const Question &l, const Question &r)
              {
                return std::stoi(l.id) < std::stoi(r.id);
              });
    return true;
  }
GetQuestion
bool GetQuestion(const std::string &id, Question *question) const
{
  // 1. 根据 id 找到题目的具体信息
  auto it = model_.find(id);//迭代器是const的
  if (it == model_.end())
  {
    // 该 id 对应的题目不存在
    LOG(ERROR) << "Question not found! id=" << id << "\n";
    return false;
  }
  *question = it->second;
  return true;
}
oj_server-C
知识点
(void) req是为了可以lambda不用的时候对他做一个处理,否则会爆出一个警告
思路
- 加载数据
- 设定路由
- 获取所有的问题列表
- 获取某个问题的详细页面
- 提交编译并获取结果(失败几个用例)
加载数据
加载数据这里其实我们只希望model加载一次,我们就放在外面初始化,不要放在get里面,然后利用lambda的捕捉获取到model,这个类可以帮助我们
处理字符串
server.Get(R"(/question/(\d+))", [&model](const Request& req, Response& resp) {
}
raw string(c++ 11), 转义字符不生效. 用来表示正则表达式正好合适,
R”()”就是引入的原始字符串的方法
关于正则表达式, 只介绍最基础概念即可. \d+ 表示匹配一 个数字
post和complier是很像的
#include "httplib.h"
#include "util.hpp"
#include "compile.hpp"
#include "oj_model.hpp"
#include "oj_view.hpp"
int main() {
using namespace httplib;
// 1. 加载 model 数据
OjModel model;
// 2. 设定路由(路由指的是每一个 URL 的 PATH 对应的处理函数是什么)
// 此处需要设定三种路由
// a) 获取所有的问题列表
// b) 获取某个问题的详细页面
// c) 提交编译并获取结果(失败几个用例)
Server server;
server.Get("/all_questions", [&model](const Request& req, Response& resp) {
(void) req;
std::vector<Question> questions;
model.GetAllQuestions(&questions);
std::string html;
OjView::RenderAllQuestions(questions, &html);
resp.set_content(html, "text/html");
});
// raw string(c++ 11), 转义字符不生效. 用来表示正则表达式正好合适
// 关于正则表达式, 只介绍最基础概念即可. \d+ 表示匹配一个数字
// 语法参考 <<正则表达式30分钟入门教程>>
// http://help.locoy.com/Document/Learn_Regex_For_30_Minutes.htm
server.Get(R"(/question/(\d+))", [&model](const Request& req, Response& resp) {
// 用这个代码来验证 req.matches 的结果是啥
// LOG(INFO) << req.matches[0] << "," << req.matches[1] << "\n";
Question question;
model.GetQuestion(req.matches[1].str(), &question);
std::string html;
OjView::RenderQuestion(question, &html);
resp.set_content(html, "text/html");
});
server.Post(R"(/compile/(\d+))", [&model](const Request& req, Response& resp) {
// 1. 根据请求获取到用户编写的代码
std::unordered_map<std::string, std::string> params;
UrlUtil::ParseBody(req.body, ¶ms);
const std::string user_code = params["code"];
// 2. 根据题目编号, 拼装出完整的可编译的代码
Question question;
model.GetQuestion(req.matches[1].str(), &question);
// 3. 交给编译模块进行编译
Json::Value req_json;
req_json["code"] = user_code + question.tail_cpp;
req_json["stdin"] = "";
Json::Value resp_json;
Compiler::CompileAndRun(req_json, &resp_json);
// 4. 根据编译结果构造最终响应
const std::string& case_result = resp_json["stdout"].asString();
const std::string& reason = resp_json["reason"].asString();
std::string html;
OjView::RenderCompileResult(case_result, reason, &html);
resp.set_content(html, "text/html");
});
// 设定 http 服务器的根目录
server.set_base_dir("./wwwroot");
LOG(INFO) << "Server Start!\n";
server.listen("0.0.0.0", 9091);
return 0;
}oj_view
思路
我们需要这一个view来实现渲染,生成html,通常叫做网页渲染
这里面我们使用模板来解决问题好了,不要自己去C++语法拼写
#pragma once
#include <vector>
#include <string>

#include <ctemplate/template.h>

#include "oj_model.hpp"

const std::string TemplateBase = "./template_pretty/";

class OjView {
public:
  static void RenderAllQuestions(const std::vector<Question>& questions,
      std::string* html);

  static void RenderQuestion(const Question& question,
      std::string* html) ;


  // 前三个参数分别对应 JSON 中的 stdout, reason 字段
  static void RenderCompileResult(const std::string& question_stdout,
      const std::string& question_reason,
      std::string* html) ;
};
template
使用第三方库,这是谷歌搞得一个第三方库,这是一个商业库,比较复杂一点,不想httplib,这个之不是一个玩具,无法商用
#include <ctemplate/template.h>C++直接开发html太麻烦,使用网页模板解决问题,模板类似于填空题,实现好一个HTML就可以把其中一些需要动态计算的 数据挖个空留下来,处理请求过程中,根据计算结果来填写这样的空
- 先创建一个ctemplate对像,这是一个总的组织数据的对象
- 循环的往这个对象中添加一些子对象
- 每一个子对象在设置一些键值对
- 数据替换,生成最终的html
那么相当于是复制粘贴之后的替换
出现乱码问题,这是字符集的问题,改成UTF-8的字符集
RenderAllQuestions
针对的是模板all_question.html
//需要一个ctemplate/template.h
static void RenderAllQuestions(const std::vector<Question>& questions,
      std::string* html) {
    ctemplate::TemplateDictionary dict("all_questions");
    for (const auto& question : questions) {
      ctemplate::TemplateDictionary* table_dict
        = dict.AddSectionDictionary("question");
      table_dict->SetValue("id", question.id);
      table_dict->SetValue("title", question.title);
      table_dict->SetValue("star", question.star);
    }
    ctemplate::Template* tpl = ctemplate::Template::GetTemplate(
        TemplateBase + "all_questions.html", ctemplate::DO_NOT_STRIP);
    tpl->Expand(html, &dict);
  }
all_question.html,是显示所有问题的模板
<html>
<head>
  <meta http-equiv="content-type" content="text/html;charset=utf-8">
</head>
<body>
  {{#question}}
  <div>
    <a href="/question/{{id}}">{{id}}.{{title}}({{star}})</a>
  </div>
  {{/question}}
</body>
</html>
RenderQuestion
针对的是模板question.html
static void RenderQuestion(const Question& question,
     std::string* html) {
   ctemplate::TemplateDictionary dict("question");
   dict.SetValue("id", question.id);
   dict.SetValue("title", question.title);
   dict.SetValue("star", question.star);
   dict.SetValue("code", question.header_cpp);
   dict.SetValue("desc", question.desc);
   ctemplate::Template* tpl = ctemplate::Template::GetTemplate(
       TemplateBase + "question.html", ctemplate::DO_NOT_STRIP);
   tpl->Expand(html, &dict);
 }
question.html,是显示单个问题的模板
和之前多了一个描述
换行不是\n所以说需要把所有的替换成
,或者是可以使用一个
标签,很好用然后还要一个编辑框,放右边的话,HTML是很难的,需要cssbang'zhu
<html> <head> <meta http-equiv="content-type" content="text/html;charset=utf-8"> </head> <body> <div>{{id}}.{{title}}({{star}})</div> <div><pre>{{desc}}</pre></div> <div> <form action="/compile/{{id}}" method="post"> <textarea name="code" rows=30 cols=100>{{code}}</textarea> <br> <input type="submit" value="Submit"> </form> </div> </body> </html>RenderResult
static void RenderCompileResult(const std::string& question_stdout, const std::string& question_reason, std::string* html) { ctemplate::TemplateDictionary dict("case_result"); dict.SetValue("case_result", question_stdout); dict.SetValue("compile_result", question_reason); ctemplate::Template* tpl = ctemplate::Template::GetTemplate( TemplateBase + "case_result.html", ctemplate::DO_NOT_STRIP); tpl->Expand(html, &dict); }case_result.html
<html> <head> <meta http-equiv="content-type" content="text/html;charset=utf-8"> </head> <body> <div><pre>{{compile_result}}</pre></div> <div><pre>{{case_result}}</pre></div> </body> </html>完整的server
int main() { using namespace httplib; // 1. 加载 model 数据 OjModel model; // 2. 设定路由(路由指的是每一个 URL 的 PATH 对应的处理函数是什么) // 此处需要设定三种路由 // a) 获取所有的问题列表 // b) 获取某个问题的详细页面 // c) 提交编译并获取结果(失败几个用例) Server server; server.Get("/all_questions", [&model](const Request& req, Response& resp) { (void) req; std::vector<Question> questions; model.GetAllQuestions(&questions); std::string html; OjView::RenderAllQuestions(questions, &html); resp.set_content(html, "text/html"); }); // raw string(c++ 11), 转义字符不生效. 用来表示正则表达式正好合适 // 关于正则表达式, 只介绍最基础概念即可. \d+ 表示匹配一个数字 // 语法参考 <<正则表达式30分钟入门教程>> // http://help.locoy.com/Document/Learn_Regex_For_30_Minutes.htm server.Get(R"(/question/(\d+))", [&model](const Request& req, Response& resp) { // 用这个代码来验证 req.matches 的结果是啥 // LOG(INFO) << req.matches[0] << "," << req.matches[1] << "\n"; Question question; model.GetQuestion(req.matches[1].str(), &question); std::string html; OjView::RenderQuestion(question, &html); resp.set_content(html, "text/html"); }); server.Post(R"(/compile/(\d+))", [&model](const Request& req, Response& resp) { // 1. 根据请求获取到用户编写的代码 std::unordered_map<std::string, std::string> params; UrlUtil::ParseBody(req.body, ¶ms); const std::string user_code = params["code"]; // 2. 根据题目编号, 拼装出完整的可编译的代码 Question question; model.GetQuestion(req.matches[1].str(), &question); // 3. 交给编译模块进行编译 Json::Value req_json; req_json["code"] = user_code + question.tail_cpp; req_json["stdin"] = ""; Json::Value resp_json; Compiler::CompileAndRun(req_json, &resp_json); // 4. 根据编译结果构造最终响应 const std::string& case_result = resp_json["stdout"].asString(); const std::string& reason = resp_json["reason"].asString(); std::string html; OjView::RenderCompileResult(case_result, reason, &html); resp.set_content(html, "text/html"); }); // 设定 http 服务器的根目录 server.set_base_dir("./wwwroot"); LOG(INFO) << "Server Start!\n"; server.listen("0.0.0.0", 9091); return 0; }扩展点
- 界面优化
- 安全优化,有些可能产危险行为
- eg:黑名单,类似的避免XSS攻击也是黑名单
- 分布式系统:隔离服务器,避免和数据库放到一起等等,但是成本上升
- 支持用户管理功能:注册,登录,用户管理系统,用户历史数据
- 评论问题
- 数据存储的扩展 基于MySQL/Redis
- 服务器的拆分(前端/编译),开销大的操作最好需要单拎出来操作
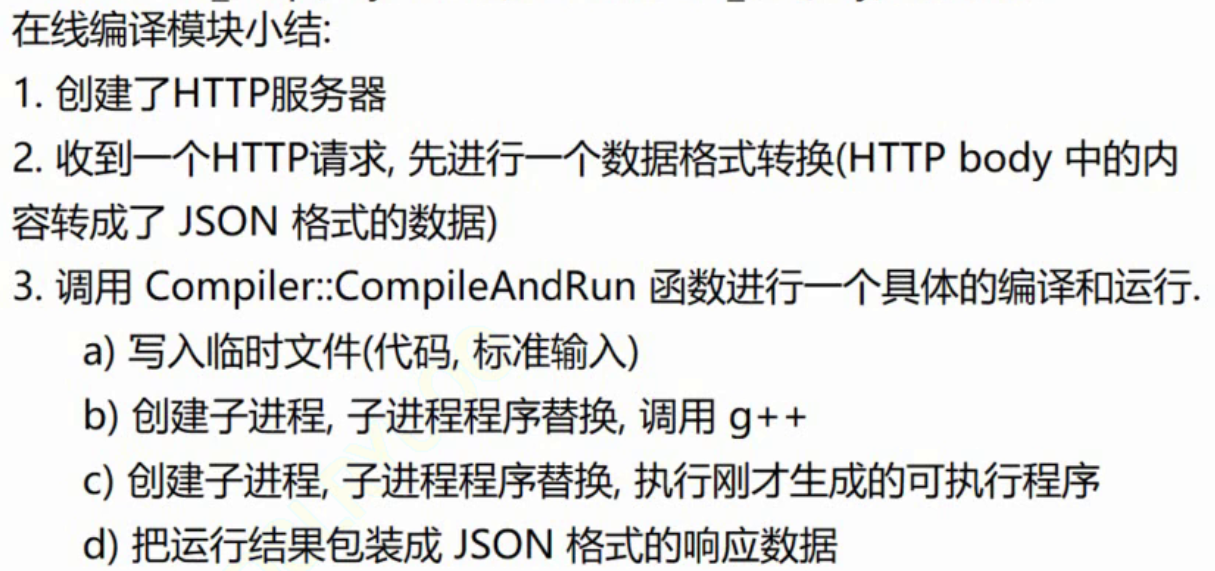
描述项目
核心功能:
在线编译模块
获取到要编译的代码生成临时文件
调用g++进行编译,把编译结果揭露到临时文件
运行可执行文件,执行测试用例代码,把运行结果记录到临时文件中
把结果打包成最终的响应数据,并返回
题目管理模块
- 题目如何储存
- 题目管理模块要对外提供那些接口
- 题目管理模块涉及到的界面如何展示
如何限制子进程运行时间
- 闹钟信号(如果是ms级的限制就不好弄了)
- 非阻塞轮询的waitpid,手动计时,如果时间到就kill掉子进程
查看依赖
ldd + [name].cpp统计代码数量
wc -l *.cpp *.cc优化
比较好看的界面
先复制粘贴+做减法
<!DOCTYPE html> <html lang="en"> <head> <meta charset="utf-8"> <title>我的OJ - {{title}}</title> <meta name="description" content="我的OJ" /> <meta name="viewport" content="width=device-width, initial-scale=1.0"> <!--Bootstrap 4--> <link rel="stylesheet" href="/css/bootstrap.min.css"> </head> <body> <nav class="navbar navbar-expand-md navbar-dark fixed-top sticky-navigation"> <a class="navbar-brand font-weight-bold" href="#">我的OJ</a> <button class="navbar-toggler" type="button" data-toggle="collapse" data-target="#topMenu" aria-controls="navbarSupportedContent" aria-expanded="false" aria-label="Toggle navigation"> <span class="navbar-toggler-icon"></span> </button> <div class="collapse navbar-collapse" id="topMenu"> </div> </nav> <!--components--> <section class="my-5 pt-5"> <div class="container"> <div class="jumbotron"> <h1>{{id}}.{{title}}({{star}})</h1> <div><pre>{{desc}}</pre></div> </div> <div class="form-group"> <div id="editor" style="min-height:400px"><textarea class="form-control" id="" name="code" rows=30 cols=100>{{code}}</textarea> </div> <input type="button" id="submit" class="btn btn-primary" value="提交" onclick="run({{id}})"> </div> <div class="jumbotron" id="output"></div> </div> </section> <!--footer--> <section class="py-5 bg-dark"> <div class="container"> <div class="row"> <div class="col-md-6 offset-md-3 col-sm-8 offset-sm-2 col-xs-12 text-center"> <!-- <h3>Upgrade to Pro Version</h3> <p class="pt-2"> We are working on <b>Charcoal Pro</b> which will be released soon. The pro version will have a lot more components, sections, icons, plugins and example pages. Join the waiting list to get notified when we release it (plus discount code). </p> <a class="btn btn-warning" href="https://wireddots.com/newsletter">Join Waiting List</a> <hr class="my-5"/> --> <p class="pt-2 text-muted"> © made by allen </p> </div> </div> </div> </section> <script src="https://code.jquery.com/jquery-3.1.1.min.js"></script> <script src="https://cdnjs.cloudflare.com/ajax/libs/popper.js/1.12.3/umd/popper.min.js"></script> <script src="https://maxcdn.bootstrapcdn.com/bootstrap/4.0.0-beta.2/js/bootstrap.min.js"></script> <script src="/js/app.js"></script> <!-- ace --> <script src="https://cdn.bootcss.com/ace/1.2.9/ace.js"></script> <script src="https://cdn.bootcss.com/ace/1.2.9/ext-language_tools.js"></script> <script> var editor = ace.edit("editor"); editor.setOptions({ enableBasicAutocompletion: true, enableSnippets: true, enableLiveAutocompletion: true }); editor.setTheme("ace/theme/twilight"); editor.session.setMode("ace/mode/c_cpp"); editor.resize(); document.getElementById('editor').style.fontSize = '20px'; function run(question_id) { var code = editor.getValue() htmlobj = $.ajax({ url: "/compile/" + question_id, type: "POST", data: { "code": code }, contentType: 'application/x-www-form-urlencoded; charset=UTF-8', async: false, }); // alert(htmlobj.responseText) $("#output").html(htmlobj.responseText); } </script> </body> </html>守护进程
如果说我们要使这个可执行程序在关闭远程连接的时候也能使用的话,那么就需要创建一个守护进程,那么只要daemon(1,1)或者daemon(0,0)就可以